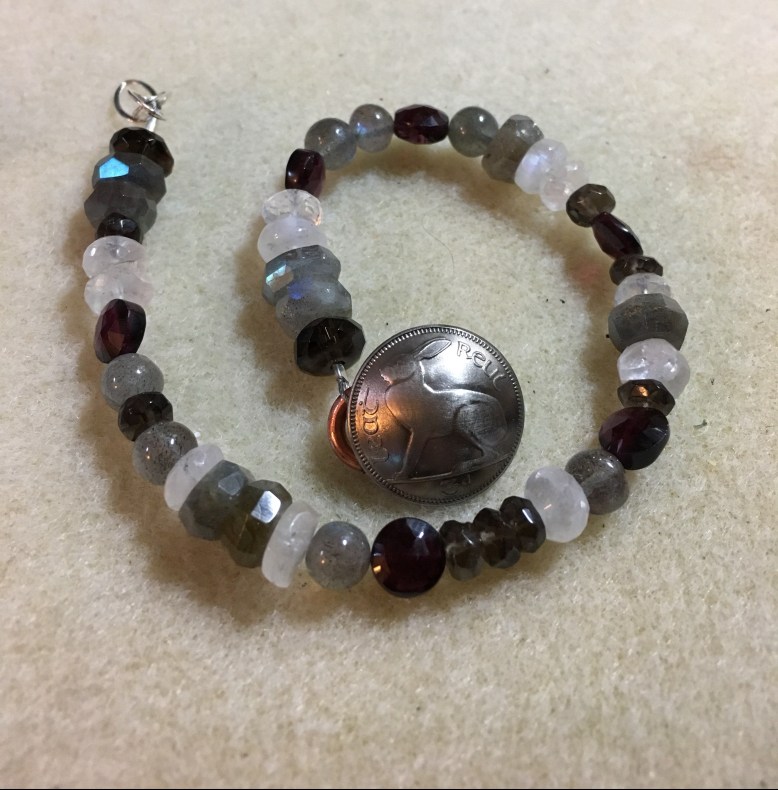
Swirls: the Art Elements theme reveal

Swirls.

Its the time of month – reveal time for our theme challenge at Art Elements. Marsha picked a wonderful theme – so many ideas! This month does involve Bead Fest, travel, Lesley visiting from the UK – so I was glad it was a theme that resonated so strongly with my creative self.

IMG_0164

Travelogue doodles at Bead Fest.

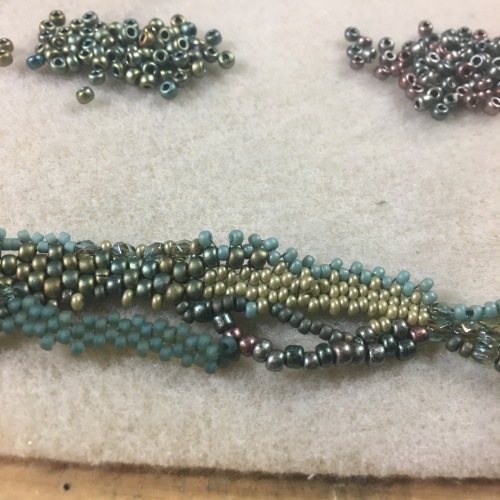
My main swirly piece is a beaded tapestry I am working on – although swirls were on my mind even in doodles ( see above.)

IMG_0042

IMG_0040

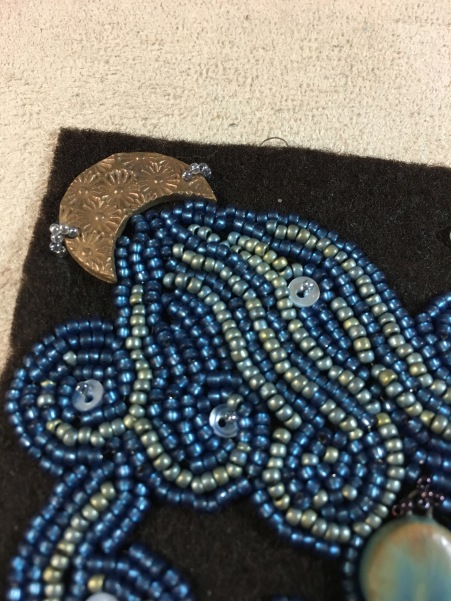
This piece is approximately 3 x 5″ and features a swirly ceramic goddess by Lesley! There is a bronze clay moon, antique miniature buttons and beads, so many beads. I wanted the swirls to be evident in color – and am keeping size and texture of the beads uniform throughout.

IMG_0043

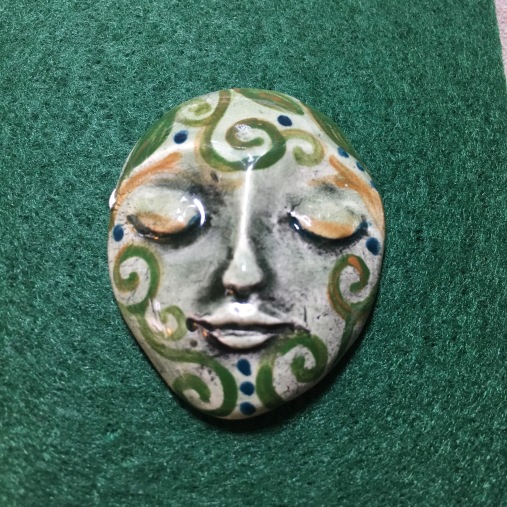
This one? Its on deck on the beading table. It was fired for Bead Fest but sadly had a flaw. Such a shame I have to keep it and bead… LOL. I also must say – once you start looking swirls are EVErYWHERE! (Chihuly installation at DE Art Museum; Art Deco door also at DMA. Hotel wall paper!) 

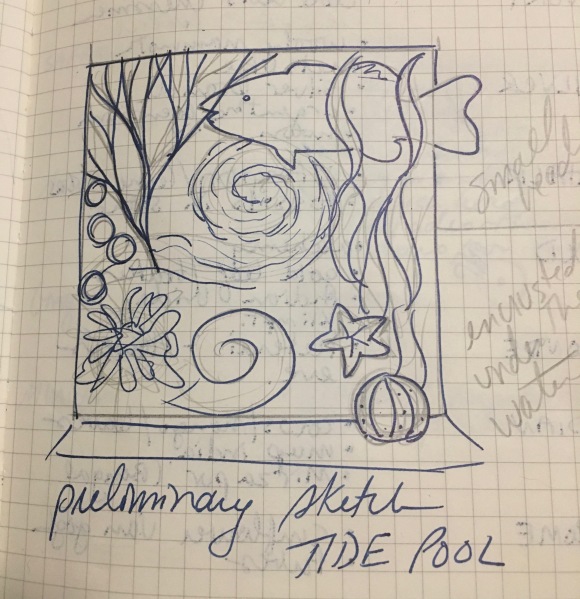
Hello – Lesley here...I’m currently vacationing with Jenny so I’m piggy-backing her blog post too. I didn’t get anything started for this challenge before I left the UK but it turns out that was a good thing because I got some great inspiration from a trip to Longwood Gardens with Marsha and Jenny. When I think swirls one of the first images that pops into my head is ferns and the wonderful patterns the newly forming leaves form as they unfurl. Fortunately for me there were examples aplenty at Longwood.

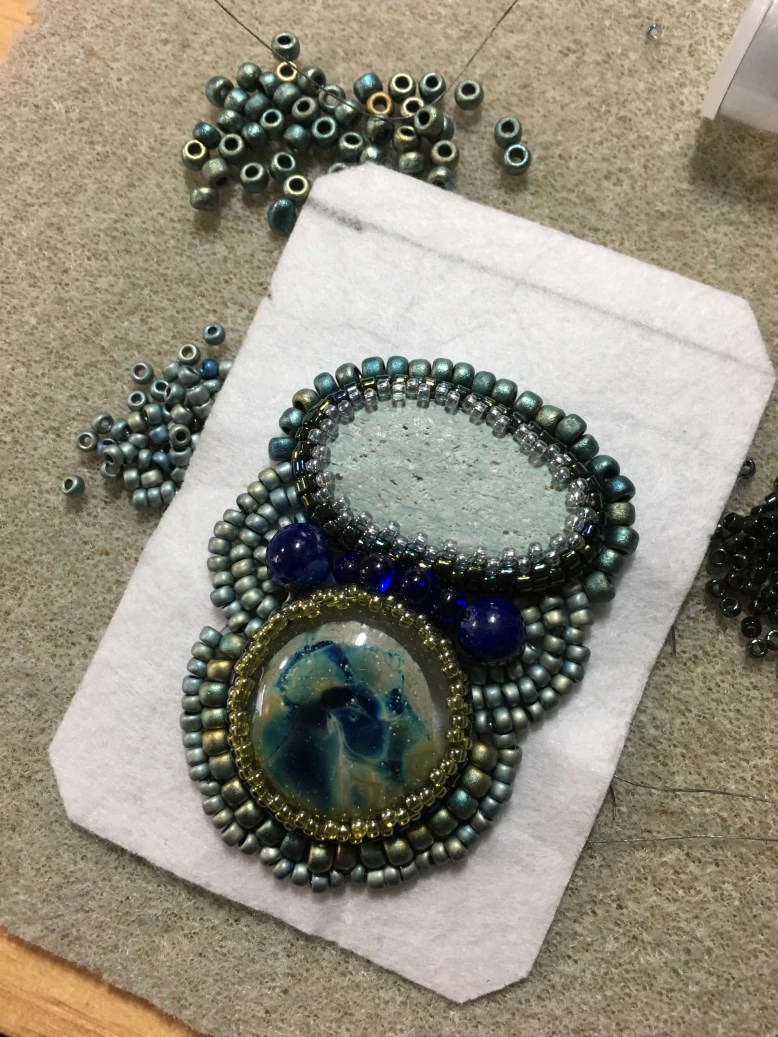
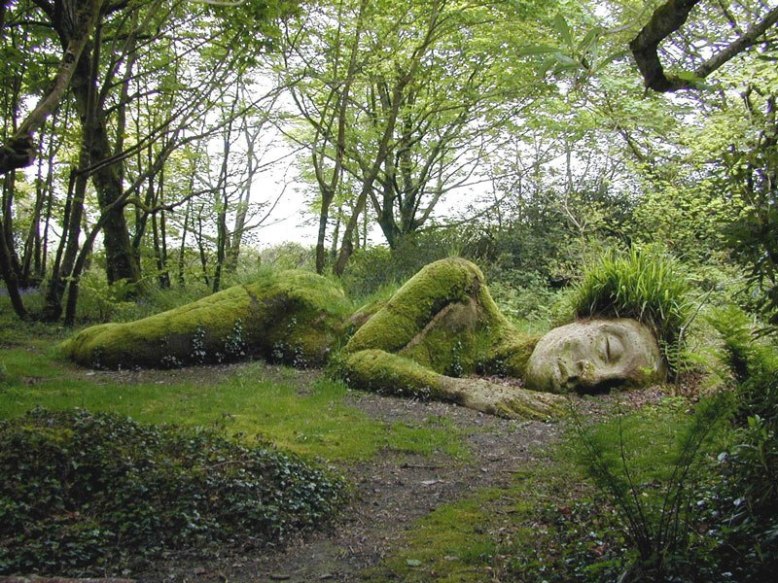
Back at Jenny’s I started to think about how I was going to use this inspiration and looked to a half face cab of Jenny’s that I’d started beading a few days earlier – unfortunately I forgot to take a photo of it then but it brought to mind the ‘Mud Maid’ sculpture from one of my favorite UK places – The Lost Gardens of Heligan.

sleeping-goddess-mud-maid-woodland-walk-lost-gardens-of-heligan-england1

I decided I could use these two elements to create by own beaded Fern goddess and this is what I’ve come up with so far…

40247179_232574927422808_967689529454493696_n

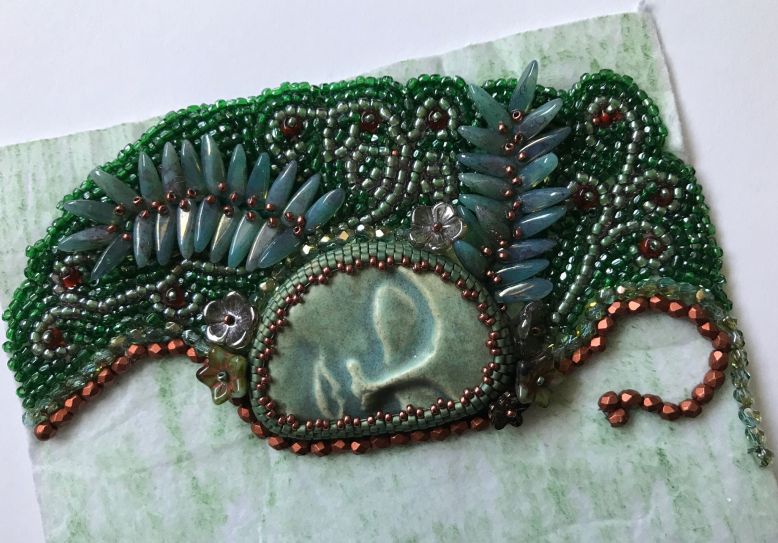
Jenny’s cab has been bezeled with Peyote stitched and then I’ve just free-form beaded around it – the excess backing will be trimmed away to give a contoured edge. I’ve used dagger beads to create mature fern fronds and seed beads to represent the swirling new growth. Fire polished crystals give some organic structure and random flower beads add texture. It’s not finished yet because I’m not sure exactly how I want to continue. The plan is for the lower portion to graduate into slightly more earthy colors and finish up with some sort of fringing to suggest the ground and roots. I need to take some time to think it through so it will probably happen when I get home. so far though I’m pretty pleased with it.

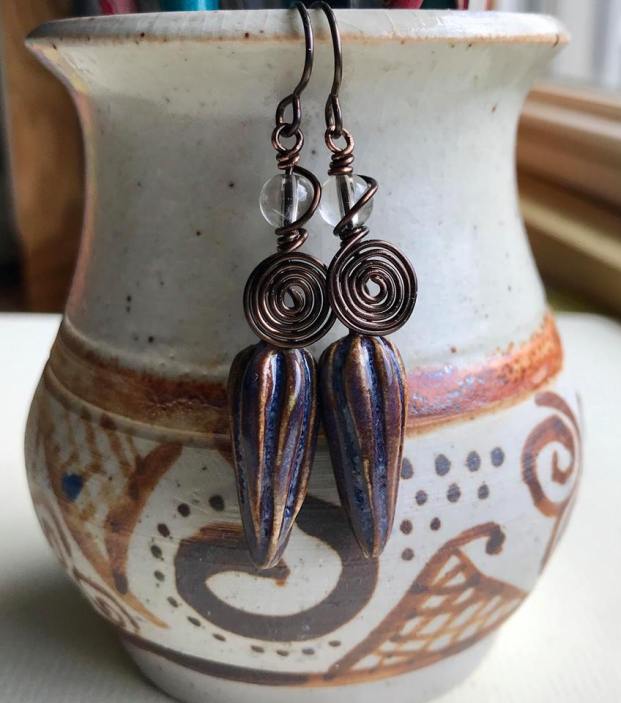
I did also manage make a couple of other pieces – both using ceramic components from our lovely host Marsha. First up a pair of earrings using the yummy pod charms she made for the last Art Elements challenge. I added some swirling wire and some pale smokey quartz beads to come up with this design that I’m pretty happy with…kinda cute and very easy to wear.

40094917_525693627852525_3952811582517411840_n

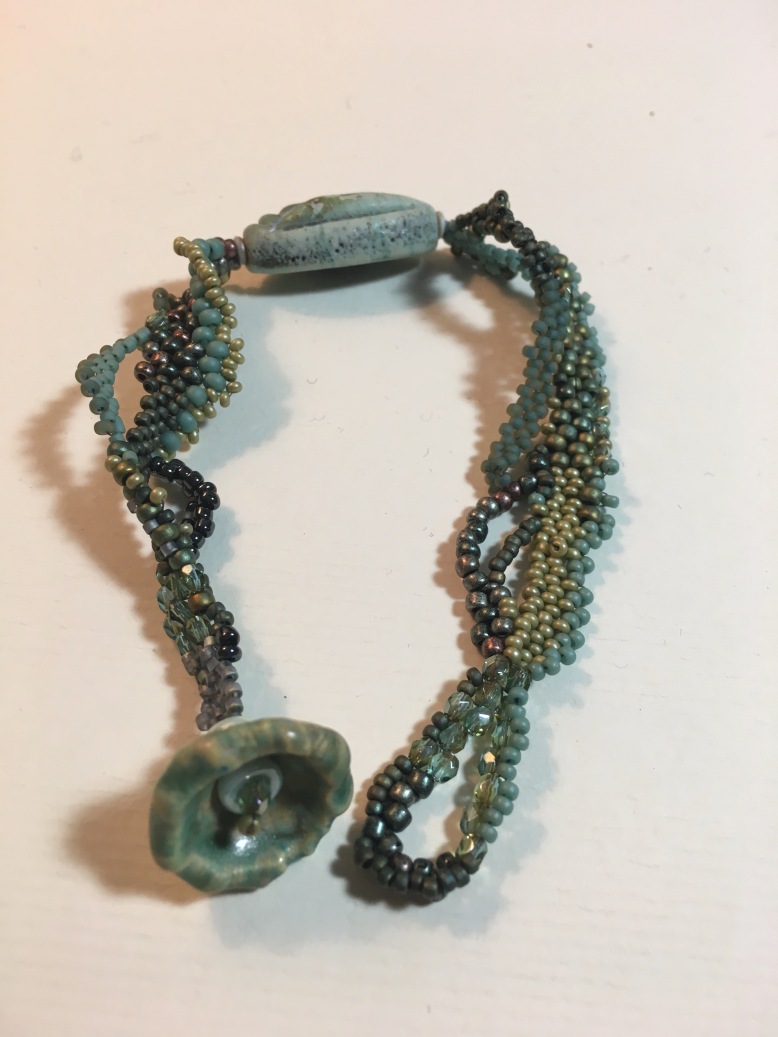
Finally I beaded (because that’s what you do when you stay at Jenny’s) a pendant using a swirly cab of Marsha’s that I brought from home.

40096957_1860631837337742_1834595709983129600_n

This one is in my trademark muted autumnal tones and uses a lovely Peyote mix I picked up at Bead Fest…pretty simple but again very wearable.

So that’s where Marsha’s challenge took me and to be honest, I could probably go on for ever with this theme as there is no end of inspiration. So a big thank you to Marsha for giving us this opportunity, to Jenny for letting me raid her bead stash and to both of them for taking me to the wonderful Longwood Gardens.

I hope you’ve enjoyed our offerings and will join us on our blog hop to see what all the other participants have come up with – just click on the links below. Enjoy!

Guest Artists:

Alison

Anita

Cat

Caroline

Jill

Kathy

Karin

Kimberly

Mischelle

Raven

Sarajo

Susan

Tammy 

Art Elements Team: 

Cathy

Caroline

Claire

Jen

Jenny & Lesley

Laney

Marsha

Susan


Helianthus. The Sunflower reveal at Art Elements.

Welcome! To the glorious summer time and the reveal of our creative challenge theme for this month over at Art Elements blog. This month: Sunflowers selected and hosted by Sue Kennedy of Sue BeadsIMG_8909
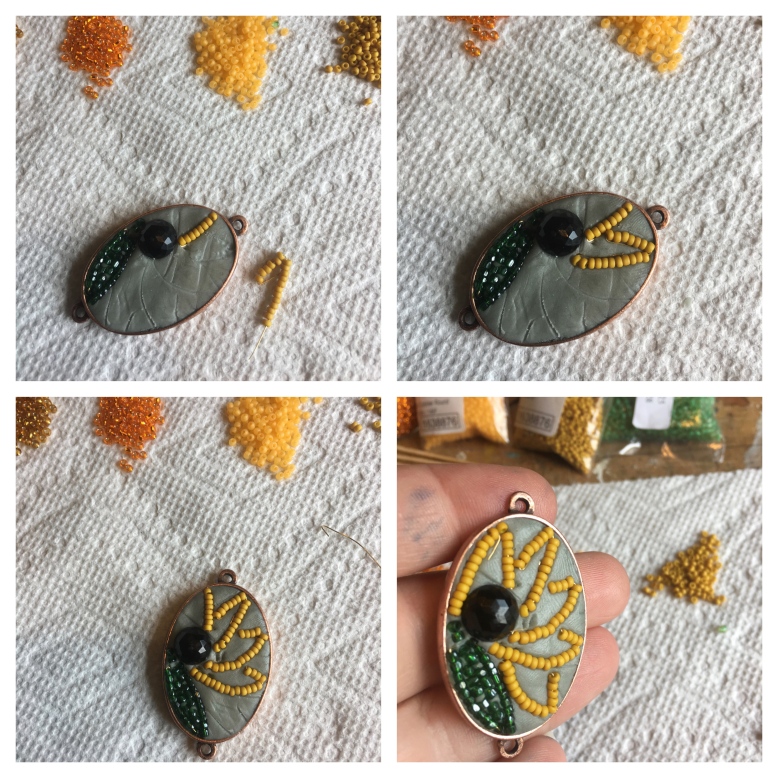
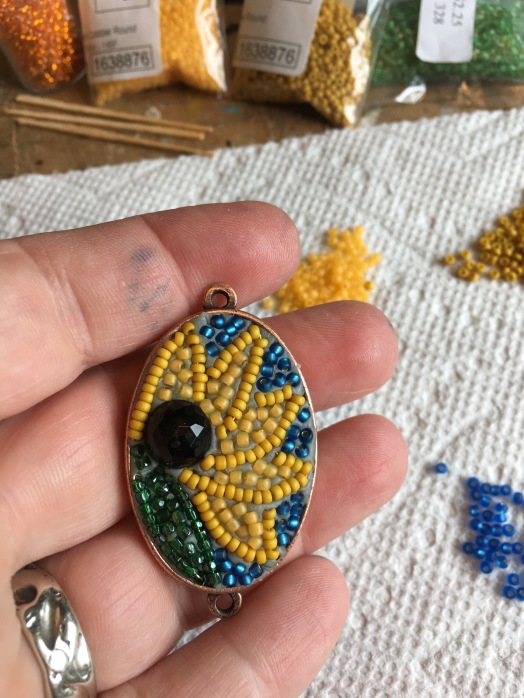
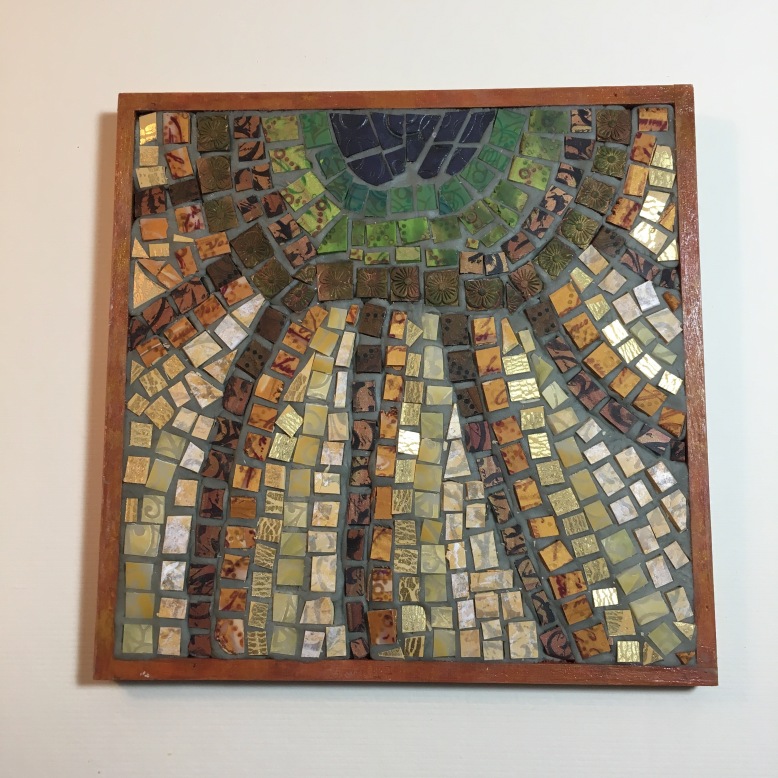
Helianthus. In Greek myth the sunflower used to be a nymph. She was an ocean nymph named Clytie who fell in love with Helios, Titan of the Sun. It’s a tale of abandonment, revenge, and unrequited love worthy of a modern soap opera. In the end, she became a sunflower, turning her head to follow Helios progress across the sky, yearning for him still.

As I am inspired by myth, I started there. But the tale was too tragic; albeit a recurring motif in Greek myth. So I decided to honor a wild hare of an idea that was taping mean the shoulder for the last year: micro mosaics.

I have a few beads ( cue laughter) so I selected a sunflower palette. For the center  of the flowers I am using an antique faceted jet button. For the “grout” and substrate I am using Apoxie sculpt. So – snap the gloves on and mix it up…

IMG_8879

Bezels and palette – ready to dive in.

I sketched the petals into the apoxie and started… to be met with immediate frustration. I wanted the beads to sit up – so holes were hidden. Tried tweezers, which worked – but just too tedious. I started stringing beads for each line on 28 gauge brass wire – essentially making elements to inlay as opposed to individual 11* seed beads! Much better!

sunf bead mosaic

Tedious! Making modifications on the fly.

IMG_8887

This is basically what I imagined.

The second bezel? Lets use larger beads! Lets use shaped beads… The palette had to change based on what I had on hand. The working time for Apoxie sculpt is 1-3 hours. For this process – earlier, softer consistency was preferred.

IMG_8889

Looser in inspiration, larger beads!

So if the seed beads are smaller than I wanted to work with – lets make larger mosaic tiles. Christi Friesen has been doing some crazy cool polymer mosaics lately – and those ideas were percolating in my mind.

First I created and cured my printed polymer veneers. This was the palette for my next mosaic.

sunf veneer

Polymer printed veneers – my mosaic palette.

I was working in a pine tray/frame. Painted and sealed first ( acrylic paint and gloss gel medium) I decided on the zoomed in image you saw at the start of my post. The cured veneers cut easily with Xacto knife, or even scissors. My Apoxie is grey – so rather grout like. ( Manufacturer says it can be painted after curing. I chose not to try that in this application.)

sunf WIP

Layout, and progress.

For my first try – I am basically pleased with that. I love the gold leaf shimmer from that one veneer. If I were doing this again – I think i would do more layout and pre-planning. Have more carefully fitted and cut tiles. While the spontaneity of this was fun, and rather freeing for me – I can see so much room to experiment with this process.

IMG_8934

The finished polymer mosaic.

Lastly – micro mosaics! I had all the polymer scraps… I had to try! These mosaics are “grouted” with TLS ( liquid sculpey) and cured to regular time/temperature. I liked these the best. I am still pondering why… was it that I didn’t love the Apoxie? That I had no time pressure here? That they were smaller/faster/less tedious? Whatever the reason – I may have to try these again. What are your thoughts?

sunf micro

Listed below is a complete list of this month’s participants – both team members and guests.  Take a look at their creations! Enjoy!

And see you next month!

Guests

AE Team

Surfacing: the Art Elements “tidepool” theme challenge

This month I dove into the theme late. I had been away for many weeks, and I am doing my grief work after losing my mother. I relished the chance to dive into the beads, to busy my hands and still my mind a bit.

Lesley selected the theme “Tide pool” and it is  – as these themes can be – so rich that it was hard to narrow my ideas down to one piece. My first ever tide pool experience was in La Jolla CA on vacation with my husband before we relocated there. I was enchanted by the calm encapsulated worlds amidst the rocks and tumultuous spray.

My plan was influenced by the enameled fish I received from Anne at Gardanne Beads. While it takes my pieces from tide pool to ocean – I feel both worlds are represented…

IMG_8337 (1)

My teaser sketch – after I had selected artisan beads.

The preliminary stages had me stitching on the densely encrusted tide pool items at the bottom of the 3″ square. The fish swims amidst leather kelp; (if you EVER get a chance to go the the Aquarium in Monterey Bay CA, do so! The kelp forest is ethereal!). Then there is that rather unsightly blob in the lower left. Needle felted from a scrap of wool – its simply a form, an armature of sorts for…

IMG_8339 (1)

What is that blob?

img_8340-1.jpg

Oh my…

… the anemone! I didn’t have exactly the right colors to achieve an ombre effect on the arms? tentacles? but I am still pleased. so now – the piece in its entirety. All 3″ of it!

IMG_8372 (1)

“Surfacing”… my finished tide pool inspired piece.

Details: 1. the anemone in situ. 2. Caroline‘s sea urchin bead sitting on top.  3. Close up of Gardanne Beads enamel fish and Sue Beads lamp work star.

Framed in a stained wood frame – the piece is ready to hang. I like the layering of coral and kelp over the fish – creating some depth. This was a very inspiring theme to work with – thank to Lesley for the topic! Now – please – head over to my friends and colleagues blogs – to see what they have created! 

Guests

AE Team Members:

Nests: the Art Elements themed challenge reveal

Happy Spring!

Welcome to the first in our monthly themed challenges! (We have had these seasonally occurring in the past, but have recently switched to all themes, every month. ) Cathy stars us off with the theme: Nests. Her original post was filled with inspiration for jewelry, fibers, all sorts of mediums.

I knew exactly what I wanted to do… ever since this tutorial was released at Sarafina Fiber Arts, I have been thinking of nests. The timing was perfect for Spring and this challenge – and I do so love the colors and textures of the curly dyed sheep’s locks! ( Not to mention I work there part time, and find all the products, colors, textures very inspiring!

IMG_7902

The first one – a little wild and unruly. 

IMG_7904

Natural colors, mostly… and a scrap of suede.

Sara of Sarafina Fiber Arts shares her tutorials on You tube – you can find the nest tutorial here. When I first saw the nest samples I wanted to fill them with earthy polymer goddesses. So I did:

IMG_7906

This is what I originally imagined. 

IMG_7908

Under the sea

My stash of curly locks *may* lean heavily to greens, teals, and earthy forest colors – but that works well for an underwater themed nest too.

IMG_7911

The river rock balances out the coral as it was a bit heavy. 

And any color works – I made a candy fluff Easter nest for my Mom – including 3 polymer  eggs! This was great fun to do – and I have other nest ideas for my art journal that I just didn’t get completed in time.

IMG_7914

One of these things is not like the others….

Please join us on the blog hop today and see what my talented team mates and out guests have created. 

Happy Spring! 

Guest Participants-

Alysen

Anita

Divya

Kathy

Kym

Mona

Rosantia

Sarajo

Tammy

AE team members-

Caroline

Cathy

Claire

Jenny (you are here)

Laney

Leslie

Lindsay

Marsha

Niky

Magic on the Streets of London…

(OK – now I have the Smiths song stuck in my head… )

Part 2 of the trip! 

Don’t you love it when a plan comes together? Its magic… When Lesley and I realized that my visit would coincide with the Harry Potter: History of Magic exhibit at the British Library… well, you can guess the rest. What REALLY made this day magical was who joined us there!

We took the train from Bournemouth and had a lovely scenic ride through he New Forest and into London. Arriving at Waterloo and then heading to Euston by Tube – I was thrilled to see 2 of the 270 enameled labyrinths! This public art project was the creation of Mark Wallinger. In 2013, to celebrate the 150th anniversary of the Tube, 270 unique labyrinths were designed and installed. One in every Tube station. The signs aren’t labeled in any way, and were enabled by the same company that created the iconic London Underground signage. The video about the project is outstanding!

IMG_7301

Newton in Bronze by Sir Eduardo Paolozzi

IMG_7302

St Pancras station – next door. And no, we did not go on to Kings Cross platform 9 3/4.

IMG_7310 (1)

Exhibition poster: Fawkes bu artist Jim Kay

So this was a momentous occasion! I got to meet all of my team mates from the Art Elements blog! The whole UK contingent! I have to say – it was so exciting, so energetic, and yet so familiar. I have known and worked with these creative talented women for years. I treasure these friendships! And while we were meeting in person for the first time, it felt like old friends getting reacquainted!


IMG_7317

The UK team! And me! All together none place! ( From top left: Lesley Watt, Caroline Dewison, Laney Mead, Niky Sayers, me. ) 

The British Library? Heavens. I cant even find the words. We toured their exhibit first. The Magna Carta. Original Shakespeare. The Lindisfarne Gospels. Beatles lyrics scrawled in pencil on old greeting cards. Medieval girdle books. Simple awe inspiring. I was incredulous.

Then we went to the HP exhibit. ( No photographs, naturally). What a beautifully curated exhibit! Arranged in groups, mirroring the subjects at Hogwarts, the items displayed ranged from Medieval pieces from the BL collection, to handwritten notes and sketches from JK Rowling, to new illustrations by artist Jim Kay. There were also pieces from the Museum of Witchcraft in Boscastle, Cornwall. ( Drawings below from an interactive piece at the end of exhibit)

Heading home – bag filled with treasures, gifts and more than a few books…. Mendel and Malachi were rather mischievous. ( Crocheted mandrakes by Caroline!)

IMG_7320 (1)

And hijinks continued as I worked on my travel journal the next day…

IMG_7332

You can read more about my travel journal over at Art Elements. There is a nice sense of spontaneity and memory-making that I get from creating a travel collage/art journal in real time. With found papers, and a little Googling…

IMG_7340

IMG_7339

Me – I am back in the studio sculpting cauldrons that Snape might even sneer fondly over… There will be a whole new series of Mythic tiles this year. Magical creatures, witches, wizards, alchemy, and the like!

Stay tuned for part three of the trip coming soon!

The annual “Use your Stash” challenge at Art Elements!

January. Wow. Come and gone… I spent some quiet time off work, reviewing, planning… and I had a most magical vacation! ( Details coming soon – here! Stay tuned…) And I dove into the hoard of beads to use a few treasures from my stash. For a few years running we  have designated January “Use your stash” month at Art Elements blog. When you are part of such a generous creative team – the bead hoard grows. Here is what I started… and actually finished:

There were plans for many bezel and tab set pieces. They are sitting in the top right, quietly awaiting time with saw and torch. The Wire framed pieces will emerge first – frames of wrapped wire, with crystal dangles… The hare beads are by our Caroline. The fox – Heather Powers of Humblebeads.

img_7499.jpg

Every day talisman. Ceramic eye by Karen Totten

I decided to use some of the focal I had been saving as brackets for myself. I like to accessorize my FitBit – which I wear daily. I do utilize certain stones for their properties…   Hematite is used for grounding, for staying centered and stable, rooted to the Earth. Paired with an eye talisman bead of Karen’s – this feels very powerful to me. Stay centered – on the self – on the journey…

img_7500.jpg

Jen’s harlequin bead

This lampwork stunner is by Jen Cameron. I call is a harlequin as it reminds me of a jester’s motley. The colors are gorgeous. I wanted this to be something I could wear and enjoy!

IMG_7501

Blast from Diana’s past!

When I pair brackets with my Fitbit – I often stack a few on together. This paisley bracelet  bar of Diana’s was so earthy, and lovely as is… so it is partnered with deerskin lace in a triple wrap. Done. Soft, and fun to wear.

IMG_7519

Heart and stone – with cab by Sue Kennedy

So there hasn’t been much  seed beading this month – but I had two pieces planned that I was able to make progress… Sue is my go-to artist for small cabs to pair with other things. And although they are small – they re gorgeous. Above is a stone heart, and below? Its a whole world in glass! A miniature planet… that I have paired with river rock. The above is a pendant… not sure where the bottom piece is taking me…

IMG_7514

Glass planets, deep and blue!

And one more – an experimental piece.

I am always playing with ways to incorporate seed bead work and metal – happiest when I am truly doing mixed media. So here are some explorations of stitched wire frameworks incorporated into the bead embroidery.

img_7533

Mandala design with cab by Lesley.

I think this will give me options for the necklace portion, to wire wrap and keep a cohesive appearance. And I liked how the wire framework accentuated the mandala 5 petal design. Thats how the idea came to be – from the cab itself.

img_7536

Wire frame stitched in…

Please join the AE team and our guests this month – see what they have unearthed from their stash to start this year off creatively!


Snow and sparkle: The Art Elements Ornament challenge

IMG_6819

Happy Solstice! Merry Christmas! Happy Holidays! Welcome to the reveal of the Art Elements Ornaments challenge!

IMG_6313

Tray of cookies? Tray of terra cotta!

I have an ornament making tradition of my own. Every year I make one “batch” of ornaments in terra cotta. I have my Grandmother’s vintage metal cookie cutters – now used for clay. I like the sense of tradition and connection to her, as I dont really bake cookies often, and the vintage shapes never go out of style!

These terra cotta ornaments are once fired, and use my “faux majolica” technique. They are first glazed with an opaque white glaze, on top only, like icing. They the colors are layered over. They fuse together in the  firing. this color over white method is similar to traditional majolica.

This year I had another idea I wanted to try:

IMG_6256

These beaded beauties ( if I do say so myself) were inspired by The Palette and the Page gallery in Elkton Md. Lynn, one of the artist/owners does the most inspired window displays. This year she called for snowflakes of any size or medium, but limited to white, silver, cream, gold. So I HAD to bead. The snowflakes are beaded onto 4″ circles of stiff felt. I lightly marked off 6 segments to start, and built the designs out from the center.  It was almost meditative, like drawing mandalas!

Im sorry I didn’t get a picture of the windows at night. It was magical!

IMG_6824

Detailed view of my beaded snowflakes.

So pour yourself a cuppa – tea? coffee? cocoa? and sit by your tree… and journey through the ornament challenge! Have a bright New Year, see you all in 2018!

Guest Designers
Art Elements Team

The November COM reveal: lunar hare 

What a month! This month the challenge was truly challenging. The fabulous component is a clasp, a coin clasp made by Niky Sayers. And its an Irish hare coin.

22049884_10155204189958922_5967067307061402018_n

Niky’s COM offering

Now I love this as the hare is “my” animal. And I am of Celtic/Irish descent. And it looks like a full moon, and brings to mind the lunar hare that is my icon, and new logo. SO clearly this is destined for me to keep!

I knew I waned to make a bracelet – as that best shows off the clasp as focal. And there I got stuck. Because there e are SO MANY options. OK _ something I can wear daily with my Fitbit. ( I like my Fitbit, but MUST accessorize/disguise it.)


img_5935

A few of my favorite things, including related pieces by Niky in my stash!

img_5928

Or do I want to go chunky?

I debated so much… my favorite stones? chunky statement stones? symbolic stones chosen for their attributes to make it more of a talisman? And my favorite stones won!

img_5932.jpg

I know that this is an exceptionally simple, dare I say boring design. But I it means a lot to me and I will wear it all the time!

On a side note, here are some of these gems attributes: 

  • Garnet: unyielding strength, increasing willpower, vitality. 
  • Moonstone: the magic of the moon – encourages communication by promoting clear thinking, inspiration and receptivity
  • Labradorite: For self-discovery, it is excellent for awakening one’s own awareness of inner spirit, intuition and psychic abilities.
  • Smoky quartz: endurance, fostering serenity, calmness and positive thoughts,to protect and ground one physically and spiritually

Thanks to Niky for a lovely piece – and thanks for understanding my simple design choices…

Please visit my team mates and our guests! Enjoy!

Guest Designers

Art Element Team

September COM reveal: Zom-bees!

( Its good to be back – I haven’t posted in 2 months… Sigh. )

And its time for the September reveal of the Component of the Month over at Art Elements. This month  – Laney has managed to combine adorable and charming as only Laney can. May I present her lamp work “Zom-bees”…

Laney's Zom-bees

The start of it all this month! Lampwork bee beads by Laney!

I knew right away that I wanted to wet felt a flower, maybe a brooch. I mean The season is changing – won’t is feel like Fall soon?

So in the interim – my friends and I had a “Girl’s Bead Night” as we do… But hosted by Marsha – it morphed into a felting project. It was the eve of the Autumnal Equinox, and I even baked pumpkin pie. I was trying to usher in Fall even though it was in the high 80’s…

I took ZERO pix during the evening. Food, friendship, laughter… ( Thanks to Lisa for the banner photo! ) Heres the  end result:

Kim's workspace.

Kim’s workspace. ( Pix by Kim Scheffler)

Autumn  bounty

The finished lovelies!

When I got home I realized – like the lightbulb over one’s head – that my COM was in my hands.

Zzzzzzz

I love the colors together!

My Zom-bee!

With wire tongue…

I work hardened a copper wire to form a spike. I coiled a little “sproing” for my bee. With a wire tongue of sorts and a little bending – he was in place! I love the aqua set off amongst the complementary curly locks.

So – I get to enjoy this little fellow til winter comes! Please take a look at the results from my AE team mates and out guests this month:

Guests
Team
http://www.lesleywatt.com/ – Lesley  Watt
http://www.glassaddictions.com/blog  –  Jennifer Cameron
https://jdaviesreazor.com/blog/  – Jenny Davis-Reazor
http://blueberribeads.co.uk/ – Caroline Dewison
 http://cmendola.blogspot.co.uk/– Cathy Spiey Mendola
http://laneymead.co.uk/ – Laney Mead

Sue’s Scarabs: the July COM reveal

I knew from the first it would be a bracelet.

IMG_4471

Bead/cap by Marsha Neal Studio. Scarab bead by Sue.

Do I dare? Do I dare tackle my first ever freeform peyote stitch project? I am a Virgo to the fullest, a lover of order… I do well with freeform bead embroidery – but that is a structured stitching – so I can go wild with bead shapes and colors and textures and patterns. Freeform peyote is all that freedom AND learning the structure. Adapting, working in a sculptural way.

So I tried it! I was working “along the length” of the bracelet so the bead closure and loop were in place early on in the process. The first step is stringing beads – of different sizes and colors… then going back along the length to start the peyote stitch pattern. This is the beginning:


There was a lot of tangling. Some cursing…. I decided to use 4 lb Fireline. Thin enough for multiple passes through beads, but strong and forgiving. ( I really don’t like Nymo) There are mistakes, there are sections that “ruffled” up but in general… IT WORKED!

IMG_4490

Here are the shots of the completed bracelet. It fits (me) perfectly! I will definitely take this further and experiment more with freeform peyote!

IMG_4506IMG_4509

Please pour a coffee and take a look at what my AE team mates and our guests have created! I would love to hear your thoughts… 

Guests

Deb Fortin

Lennis Carrier

Barb Fernald 

AE Team 

Diana

Lindsay

Claire

Lesley

Caroline

Laney

Cathy

Niky

Sue

(I apologize if the links are dead. I’ll fix ASAP. Waylaid by a stomach flu on vacation…. for now see all the links at Art Elements.